
Learning how to style open shelves in the kitchen is less about buying new things and more about arranging what you already own. The difference between a shelf that looks calm and collected and one that looks like clutter is usually just a few simple rules: layering, breathing room and grouping. Get those right and your everyday plates, glasses and cookbooks become the decoration — no extra spending required.
Open shelves suit almost any kitchen, and they work especially well in a small kitchen where closed cabinets can feel heavy. Our guide to small kitchen decor ideas on a budget shows how open storage can make a small room feel lighter.
Start With What You Actually Use
Before you style anything, take everything off the shelves and start again. This is the step most people skip, and it is the one that matters most. Open shelves are not a display cabinet — they hold things you reach for every day, so start with the pieces you genuinely use: your favourite mugs, everyday plates, bowls and glasses.
Keep daily items on the lowest shelf. Things you use once a week or less — the big serving platter, the fancy teapot, the stack of cookbooks — can live higher up. Anything you never use does not belong on an open shelf; move it to a closed cupboard or give it away.
The Layering Formula That Always Works
The single most useful trick is layering: place larger, flatter items at the back and smaller items in front, so every piece is partly visible and nothing is hidden completely.
Back layer: tall and flat
Start at the back with your tallest, flattest pieces — a large serving board, dinner plates stood upright, a framed print or a tall vase. These anchor the arrangement and give it height.
Middle layer: everyday pieces
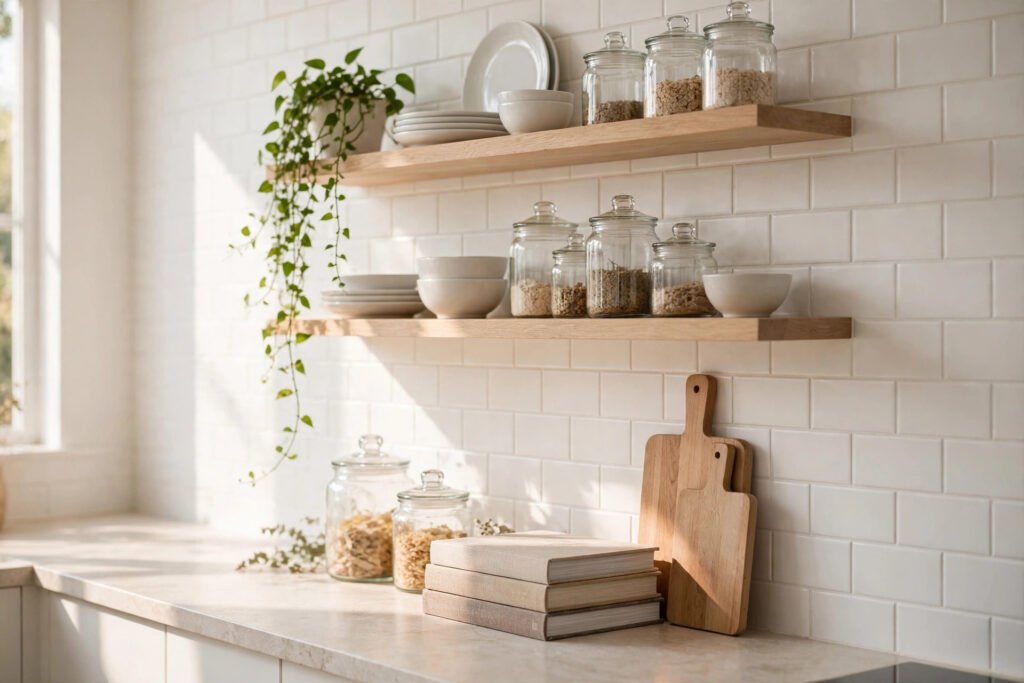
In front of those, place medium-height everyday items: stacks of bowls, rows of mugs, jars of pasta or rice. Group similar items together — four matching mugs in a row read as one calm block, while four different mugs spread apart read as clutter.
Front layer: small and decorative
Finish with one or two small pieces at the front: a tiny plant, a small bowl or a folded linen napkin. Keep them small and few — if the front layer competes with the middle layer, you have too much on the shelf.
Group in Odd Numbers and Vary the Heights
Odd numbers look more natural to the eye than even ones. Group items in threes or fives: three stacked bowls, a trio of jars, five cookbooks leaning together. A row of identical items in a straight line can look like a shop display; breaking the line with a taller piece at one end and a shorter piece at the other gives the shelf movement. Vary the heights across the shelf too — a tall plant next to a low stack of plates next to a medium-height jar creates a gentle wave that keeps the eye moving.
Leave Breathing Room
Empty space is not wasted space; it is what makes a styled shelf look calm instead of crowded. The most common mistake with open shelves is filling every centimetre. Leave a gap of at least a hand’s width between groups, and fill only about two-thirds of each shelf. The empty space lets each group stand out and makes the shelf easier to use — you can lift a plate out without knocking three other things over. If a shelf looks bare, add one taller piece rather than five small ones.
Mix Materials and Textures
A shelf made entirely of white ceramics looks clean but can feel cold. Mixing materials is what gives open shelves warmth and personality: wood, glass, ceramic, metal and greenery each bring a different texture, and the contrast is what makes the arrangement interesting. Try pairing smooth white plates with a rough wooden chopping board, or clear glass jars with a woven basket. A trailing plant softens the hard edges of plates and jars — a small pothos or herb in a simple pot works on almost any shelf and costs very little.
Keep the colour palette restrained. Two or three colours plus natural wood and greenery is plenty; if every item is a different bright colour, the shelf will look busy no matter how neatly you arrange it. White, cream and wood tones with one accent colour — sage green, terracotta or navy — works in almost every kitchen.
What to Put on Open Shelves (and What to Hide)
Some things look wonderful on open shelves; others are better kept behind closed doors. Everyday dishes, glasses, mugs, cookbooks, wooden boards, glass storage jars and plants are all ideal — attractive, used often, and better out in the open.
Hide the rest. Plastic containers, mismatched food packets, cleaning products and anything stained or chipped should live in a closed cupboard, along with the random mugs with faded logos — keep your two or three best-looking mugs on display and store the rest. Renters can use the same rules; our guide on how to decorate a rental covers storage ideas that do not need drilling or permanent changes.
Cookbooks deserve a special mention. A row of cookbooks with their spines showing adds colour and personality, and a stack of two or three laid flat with a small plant on top breaks up the vertical lines. Keep the books you actually cook from within easy reach and the rarely opened ones higher up.
Style Each Shelf Differently
Not every shelf should look the same. Give each shelf its own job: the top shelf is for display pieces and rarely used items, the middle shelves hold everyday plates, bowls and mugs, and the bottom shelf takes the heavier items you grab constantly. Keep the bottom shelf simple so nothing gets knocked over in a morning rush.
Keep It Practical
Beautiful shelves that are impossible to use will not stay beautiful for long. A few practical habits keep them looking good.
Put things back in the same place. Once you have an arrangement you like, keep it. If the mugs always live on the left of the middle shelf, they will always look tidy.
Wipe the shelves weekly. Kitchen shelves collect grease and dust faster than shelves anywhere else in the house. A quick wipe once a week keeps everything looking fresh.
Edit regularly. Every month or two, take a fresh look and remove anything that has crept onto the shelf without earning its place. Open shelves drift towards clutter if you let them — a quick edit takes five minutes.
Mind the weight. Open shelves, especially floating ones, have weight limits. Heavy stacks of plates and cast iron belong on the lowest shelf or in a cupboard, not on a high floating shelf. Check the fixings before loading a shelf up — one that sags looks worse than a bare wall, and it is a safety risk too.
Common Mistakes to Avoid
- Overfilling the shelf. If you cannot lift a plate out without moving three things, take something off.
- Mixing too many colours. Stick to two or three colours plus wood and greenery.
- Displaying everything you own. Open shelves are for your best everyday pieces, not your entire kitchen.
- Ignoring the space above and below. A shelf hung too close to the worktop is hard to use; one hung too high is hard to reach. Leave enough clearance to lift items on and off comfortably. Hanging things at the wrong height is one of the classic budget home decor mistakes — measure before you drill.
Knowing how to style open shelves is mostly about restraint: fewer, better pieces, grouped with space around them, in a calm colour palette. Start with what you use every day, layer tall pieces behind short ones and leave a third of each shelf empty.
FAQs
How do I style open kitchen shelves without them looking cluttered?
Fill only about two-thirds of each shelf, group similar items together and leave a hand’s width of empty space between groups. Stick to two or three colours plus wood and greenery, and remove anything you do not use regularly.
What should I put on open kitchen shelves?
Everyday dishes, glasses, mugs, cookbooks, wooden chopping boards, glass storage jars and small plants. Keep plastic containers, food packets and cleaning products in closed cupboards.
How many items should go on one shelf?
Three to five groups per shelf with space between them is a good guide. Fewer, larger pieces look calmer than many small ones.
How do I keep open shelves dust-free?
Wipe the shelves and the items on them once a week with a damp cloth. Pieces in daily use get washed regularly and collect less dust than display-only objects.
Are open shelves practical in a small kitchen?
Yes — they can make a small kitchen feel bigger and lighter than closed wall cabinets. Keep daily essentials on the lowest shelf, and use the higher shelves for display pieces and items you use less often.
Related reading: Small Kitchen Decor Ideas on a Budget · How to Hang Curtains the Right Way · How to Decorate a Rental