
Learning how to style open shelving living room displays is one of the fastest ways to give a living room personality without spending much money. Unlike a closed cabinet, open shelves show everything, which is both their charm and their challenge. Done well, they look curated and relaxed; done badly, they look like a storage unit that lost its doors. The seven ideas below use things you probably already own, plus a few budget buys, and they work on floating shelves, built-in alcoves and freestanding shelf units alike.
1. Start With a Clear Purpose for Each Shelf
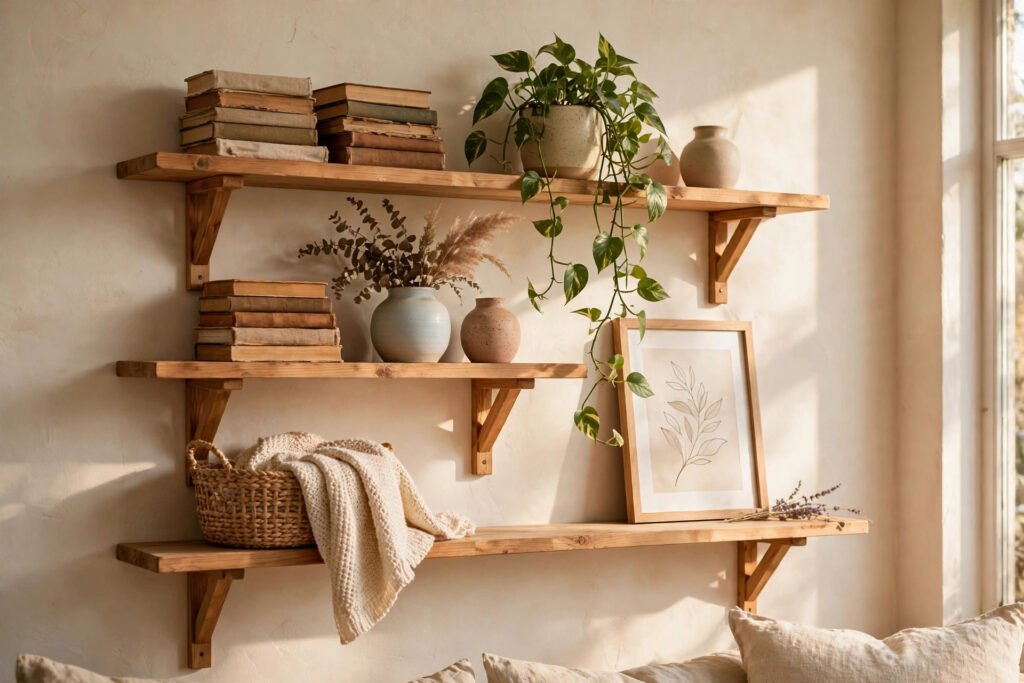
Before you place a single object, decide what each shelf is for. A shelf that tries to do everything — display, storage and a plant stand at once — ends up looking confused. Give the top shelf to display, the middle to books and objects, and the lowest to storage in baskets or boxes. That simple division makes the whole unit feel intentional.
Look at the shelves as one picture: the eye should travel smoothly from top to bottom without getting stuck on one crowded corner. If a shelf looks busy, remove one thing before adding anything else. Our guide on how to style a bookshelf like a designer uses the same idea — purpose first, objects second.
2. Mix Books With Objects, Not Books Alone
A shelf full of books looks like a library, and a shelf full of ornaments looks like a shop window. The sweet spot is a mix of the two. Place a stack of books horizontally on one side, stand a few upright beside them, and finish the row with a single object such as a vase or a small framed print. The books give weight, the object gives character.
Vary the way books sit. Horizontal stacks create little platforms that are perfect for raising a small object, while upright books with a heavy vase as a stop look relaxed and lived-in. Paperback sets cost roughly $5–$10 each second-hand, and charity shops are the cheapest source of hardbacks with attractive covers.
3. Layer Items Front to Back
Flat rows of objects lined up against the wall look stiff, which is why designers layer. Place a tall item at the back — a framed print or a large vase — then a medium item in front of it, such as a stack of books, and finish with one small object at the front edge. The overlap creates depth, and the shelf looks three-dimensional instead of flat.
Leaning art is the easiest way to start layering — no hanging, no holes in the wall. A framed print roughly $15–$30 propped against the back of the shelf gives instant height, and you can swap it whenever you fancy a change. Just make sure the frame is stable — a small strip of museum putty underneath costs almost nothing and keeps it in place.
4. Add Greenery at Different Heights
Almost every well-styled shelf has something alive on it, because plants soften hard edges and add a colour no object can match. A trailing plant on the top shelf draws the eye upward; a small potted plant on a middle shelf fills a gap between books.
Choose plants that suit the light your shelves actually get. Pothos and spider plants cope with low light and trailing stems, while a small snake plant suits a bright shelf and needs watering only every few weeks. A small plant in a plain pot costs roughly $8–$15, and a neutral terracotta or ceramic pot keeps the focus on the leaves. If real plants are not your thing, a good-quality faux plant works too — our roundup of the best affordable faux plants for home decor lists options that look convincing on a shelf.
5. Use Baskets and Boxes on the Lower Shelves
Open shelving has one weakness: it cannot hide clutter. That is why the lowest shelves should hold baskets and boxes, not loose objects. A woven basket or a fabric storage box holds remotes, chargers, board games and all the everyday bits that would otherwise make the shelves look messy.
Keep the baskets consistent — three matching seagrass baskets look far better than three different ones. Measure the shelf height before buying so the basket slides in with a little room to spare. Storage baskets cost roughly $10–$25 each, and they are one of the best-value buys for open shelving because they solve the clutter problem and add texture at the same time.
6. Leave Breathing Room on Every Shelf
The most common open-shelving mistake is filling every centimetre. Designers aim for roughly a third of each shelf to stay empty, because empty space is what makes the objects on the shelf stand out. If every shelf is packed edge to edge, nothing catches the eye and the whole unit reads as clutter, however nice the individual pieces are.
Try the “remove one thing” test: take one item off any shelf that looks crowded. Most shelves improve after one or two removals. Negative space is free, and it is the difference between shelves that look styled and shelves that look stuffed.
7. Repeat Colours and Materials to Tie It Together
A shelf full of unrelated objects in unrelated colours looks like a jumble sale, even when every piece is lovely on its own. Pick two or three colours and one or two materials, then repeat them across the shelves. Wood, black metal and cream ceramics give a calm base, while a single accent colour — sage green, terracotta or navy — repeated in a vase, a book spine and a small frame ties the whole unit together.
Group the objects you already own by colour and material, keep the ones that fit your palette, and move the rest elsewhere. A set of matching ceramic vases costs roughly $15–$30, and they act as the visual glue for the whole display. Our guide to the best affordable vases for styling shelves and tables has options in most popular colours and finishes.
Mistakes to Avoid
The biggest mistake is treating open shelves like extra storage and filling them with whatever needs a home. If an object does not look good on display, it belongs in a closed cupboard. The second mistake is buying a matching set of ornaments and lining them up in a row — identical objects in a straight line look like a shop display, not a home. Mix sizes, heights and materials, and let one shelf be a little imperfect. If you are choosing the shelves themselves, our guide to affordable wall shelves for small spaces covers sizes and styles that suit a living room.
Frequently Asked Questions
How do I style open shelving in a living room without it looking cluttered?
Give each shelf a purpose, leave a third of every shelf empty, and use baskets on the lowest shelf for anything that is not decorative. Group objects in threes and vary their heights. The empty space is what makes the rest look intentional.
What should I put on open shelves in a living room?
A mix of books, plants, baskets and a few decorative objects works best. Use books for weight, plants for softness, baskets for hidden storage, and one or two personal items, so the shelves feel like yours.
How many items should go on each shelf?
Aim for three to five groups of objects per shelf, rather than counting individual pieces. A stack of books counts as one group, a vase with a plant beside it counts as another.
Can I style open shelving on a budget?
Yes — most of the cost is in the shelves themselves, not the styling. Books from charity shops, plants in plain pots, baskets and a few thrifted vases can style a whole wall for roughly $50–$100. Start with what you already own and add one or two pieces at a time.
How do I style open shelves in a small living room?
Keep the colour palette light and the objects small, leave more empty space than you think you need, and use the top shelf for display and the bottom shelf for baskets. Avoid tall, heavy objects that crowd the room, and let one trailing plant soften the top edge.
Final Thoughts
Knowing how to style open shelving living room displays comes down to three habits: give each shelf a job, leave room to breathe, and repeat a few colours so the whole unit feels connected. Start with one shelf and live with it for a week before styling the next one. Shelves that grow slowly always look better than shelves filled in a single shopping trip. For a similar approach in the kitchen, see our guide on how to style open shelves in the kitchen — the layering and grouping rules are the same.